
Preface
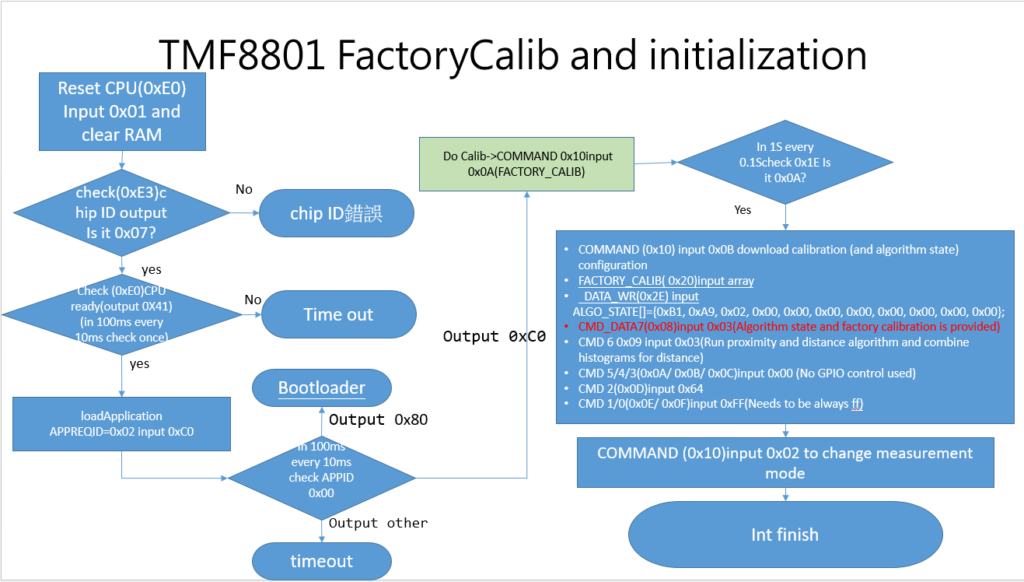
The previous article mainly introduced the initialization and FactoryCalib of AMS TOF TMF8801. In this article, we will discuss how to obtain measurement information and the process. The following flowchart is mainly compiled by me based on the previous article’s flowchart. For those who are unclear, you can refer to this table and compare it with the previous flowchart.
Get sensor distancePeak data and Confidence
unsigned int TMF8801_distancePeak_mm()
{
uint8_t buffer[2];
uint16_t distancePeak=0;
buffer[0]=read_register(0x22);
buffer[1]=read_register(0x23);
//printf("buf[0]=%#x ,buf[1]=%#x nr",buffer[0],buffer[1]);
distancePeak = buffer[1];
distancePeak = distancePeak << 8;
distancePeak += buffer[0];
return distancePeak;
};
unsigned int TMF8801_Confidence()
{
uint8_t cmd_buf[4] ={0,0,0,0},resultInfo=0,resultNumber=0,distancePeak=0;
HAL_I2C_Mem_Read(&hi2c1, Devadress,REGISTER_RESULT_NUMBER, I2C_MEMADD_SIZE_8BIT,cmd_buf,4,100);
resultNumber = cmd_buf[0];
resultInfo = cmd_buf[1];
distancePeak = cmd_buf[3];
distancePeak = distancePeak << 8;
distancePeak += cmd_buf[2];
return resultInfo;
}
After capturing the information, we found that the TMF8801 can only capture up to 660mm, which is strange!!!
After obtaining measurement information, it was found that the TMF8801 could only capture up to 660mm, which was strange. Subsequently, it took a long time to compare the Firmware provided by AMS’s official website and found that there were some differences in certain areas, and many online resources did not mention them. The key point was that even the official Application Note did not mention this. It turned out that firmware upload for TMF8801 was needed to achieve the maximum range of 2.5M specified on the official website.
Interpret Firmware upload
“First, download the firmware from the official website and open the document shown below (can be opened with Notepad)


Code
download_INT_RAM();
tmf8801_write_ram();
remap_rst_RAM();
Three steps are mainly added to write each data into the TMF8801 via I2C. Due to the different architectures of the STM32 MCU and the MPU Linux system, external files cannot be read. Therefore, the data is parsed and stored in an array in this process.
Step 1: download_INT_RAM() is mainly to initialize the TMF8801 RAM first, making it easier to write data into it later on.”
void download_INT_RAM()
{
uint8_t cmd_buf[] = {0x14, 0x01, 0x29,0xC1},ready=-1;
//uint8_t checksum=0;
/*
* cmd_buf [0]: Initialization Download HW Command (0x14)
* cmd_buf [1]: Data length (0x01)
* cmd_buf [3]: 1 byte data
* cmd_buf [4]: check bytes
*/
HAL_I2C_Mem_Write(&hi2c1, Devadress, 0x08, I2C_MEMADD_SIZE_8BIT, &cmd_buf,4, 100);
HAL_Delay(20);
//checksum=read_register(0x8B);
//printf("checksum=%#x nr",checksum);
for(int i=0;i<5;i++){
ready=__tmf8801_status_read ();
HAL_Delay(20);
if(ready==TMF8x01_OK)
{printf("download_INT_RAM oknr");
break;}
}
if(ready==TMF8x01_NK)
{for(;;);}
}
Step 2 write in the Data
void tmf8801_write_ram ()
{
uint8_t cmd_buf[19] = {0};
uint16_t buf_length = 0;
uint16_t buf_line = 0;
uint32_t tick = 0;
int i = 0;
uint16_t j = 0;
uint16_t address_pointer = 0;
// uint8_t data=0x0A;
uint8_t sum=0;
int count=0;
buf_length = sizeof(app_buf) / sizeof(app_buf[0]);
buf_line = buf_length / 16;
cmd_buf[0] = 0x41;
cmd_buf[1] = 0x10;
//printf("total count=%d rn",buf_line);
//tmf8801_set_ram_addr (0x00);
for (i = 0; i <buf_line; i++) {
//data=0x0A;//reset data
sum=0;//reset sum
address_pointer=i*16;
tmf8801_set_ram_addr (address_pointer);
for (j = 0; j < 16; j++) {
cmd_buf[2+j] = app_buf[16 * i + j];
// data=data+j;
// write_register(data,cmd_buf[2+j]);//data0~XXX
}
cmd_buf[18] = 0;
for (j = 0; j < 18; j++) {
sum+= cmd_buf[j];
}
cmd_buf[18] =~(uint8_t)sum;
HAL_I2C_Mem_Write(&hi2c1, Devadress, 0x08, I2C_MEMADD_SIZE_8BIT, cmd_buf,19, 100);
HAL_Delay(5);
/* */
while(1)
{
if (__tmf8801_status_read() == TMF8x01_OK)
{
count++;
if(count%100==0)
printf("Patch download %d(until over 690 will finish) rn",count);
break;
}
tick++;
if (tick >= 10)
{
printf("__tmf8801_write_ram fial!rn");
return ;
}
}
}
// printf("fail address=%#x rn",address_pointer);
return ;
}
The third step is relatively simple, but it is required by the datasheet that you need to perform a reset after writing the data into the RAM.
void remap_rst_RAM()
{
uint8_t cmd_buf[3]={0x11,0x00,0xEE};
int ready=-1,x=0,y=0;
//write_register(0x02,0x80);
HAL_I2C_Mem_Write(&hi2c1, Devadress, 0x08, I2C_MEMADD_SIZE_8BIT, cmd_buf,3, 100);
HAL_Delay(10);
//printf("reset RAM oknr");
//TMF8801_reset();
while(1){
y++;
if (!waitForCpuReady() && y%10==0)
{
x=read_register(0xE0);
printf("CPU staute= %#x not ready wait~nr",x);
//HAL_Delay(10);
}
else if(y>50)
{ printf("Ram reset failnr",x);
for(;;);}
else if(waitForCpuReady())
{printf("Ram reset oknr");
return;}
}
}
Pingback: AMS and STM32 (proximity )TOF sensor AMS TMF8801 coding on STM32 -1
Pingback: AMS and STM32 AMS Time-of-Flight sensor ( TMF8801 ) -1